
 Inksplats are a huge amount of fun. They’re easy to make and you probably have almost all of the materials already. In this post I’ll go over the materials you need, and the step-by-step process for using them to inspire your own creative drawings. To see some of my results, check out the blog post Inksplats Collection 1.
Before we get going, two important points. First, I didn’t invent this game. I discovered it when visiting Stefan G. Bucher’s wonderful blog http://www.dailymonster.com/. Second, I don’t know of a name for it, so I call it Inksplats.
Here’s a picture of all the materials you’ll need:
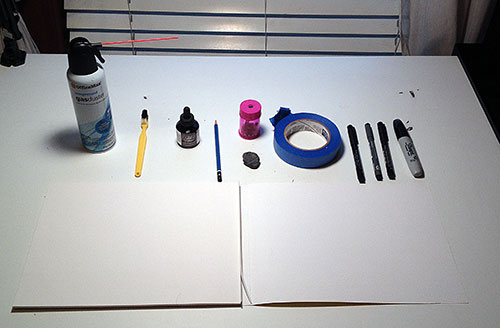 Top row, left to right: Compressed air (any office or hardware store will carry this; I got a bunch of cans at OfficeMax); an old toothbrush; black ink; a pencil; a pencil sharpener; eraser (I like the kneaded rubber kind), removable tape (I use gaffer’s tape), and some black markers of different thicknesses. Bottom row: ordinary white drawing paper.
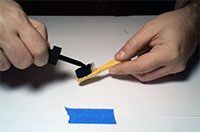 Step 1: Put some ink on the end of the toothbrush. It doesn’t have to be much. Experiment and over time you’ll get a feeling for how much to put on and where. I usually slowly drip one full dropper’s worth on the ends of the bristles; this is enough for 4 or 5 splats before i need to put on more ink.
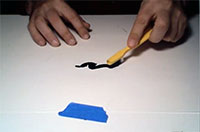 Step 2: Tape down a piece of paper to your drawing table, and make a squiggle with the toothbrush. Don’t try to make any kind of actual shape, and definitely don’t “draw” anything, or have anything in mind. Just make a fun little smudgy wobble of ink. Keep it simple.
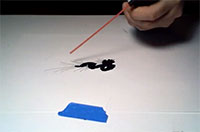 Step 3: Zap! Hit your drawing with a blast or two of compressed air. Again, don’t consciously try to make anything in particular. I just look for where the ink seems to have puddled up and I give it a quick shot or two. If you like, you can scan this as the “before” version of your drawing. Let it dry completely before moving on.
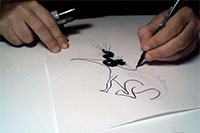
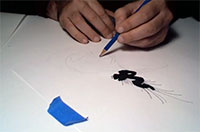 Step 4: Draw something. I use my pencil and eraser to sketch out something using the inksplat as a base. My only rule is that I can’t erase or remove any ink in the original splat. Otherwise, anything goes. Remember to spin the page around before you start; you never know which view of the splat will trigger an idea. If no ideas come, draw an eye or a nose or something and see what happens.
Step 5: Inking. I use a brush pigment marker, a very thin pigment marker, and a thicker pigment marker. I also have a big chisel-tip Sharpie for filling in big black areas. I just draw over the pencil sketch with whatever pen seems best suited to that line.
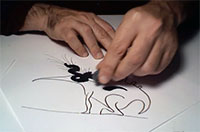 Step 6: Erase the pencil lines. This is where the kneaded-rubber eraser really shines. It erases very well without leaving behind the tons of little shavings you can get from other kinds of erasers. Plus, the kneaded rubber is fun to play with while you’re thinking and drawing; it’s like a functional piece of Silly Putty.
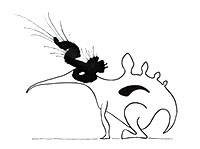 Step 7: That’s it! Your drawing is finished. I scan the inked version with my flatbed scanner and do some minor cleanup work in Photoshop to fix little errors or clean up stray marks.
Man, you can draw in a way that attaches limbs to a body in a believable way 😉